How to Draw Cool Anime Eyes
In this tutorial, you will learn how to describe anime-fashion eyes.
I volition explain the unlike shapes and styles, how to apply basic colors, how some expressions work, and finally, how to draw anime-style eyes as a function of an illustration. You can besides follow this step-by-step video tutorial (in Spanish only):
Index
- Basic Middle Study
- Real Eyes vs Anime Optics: Proportions
- Variations
- Styles and Greyscale
- Shapes and Colors of Anime Eyes
- How to Color Anime Eyes
- Expressions for Anime Optics
- Last Illustration and Anime Optics
1. Basic Eye Study
Earlier you beginning cartoon and designing anime-mode eyes, it is essential to learn the basic shapes of real eyes. This will make the stylization process much easier.
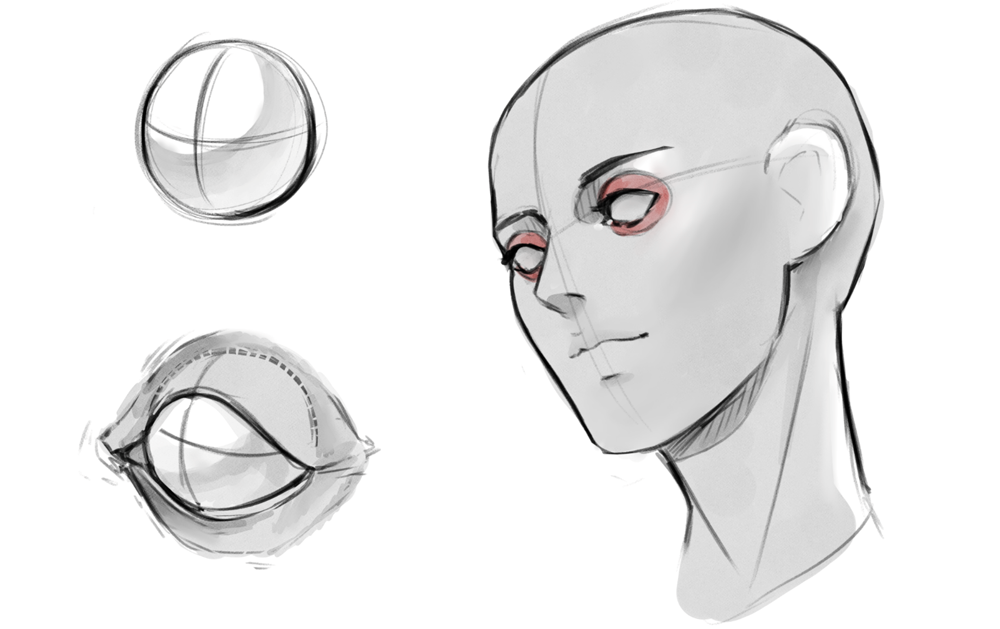
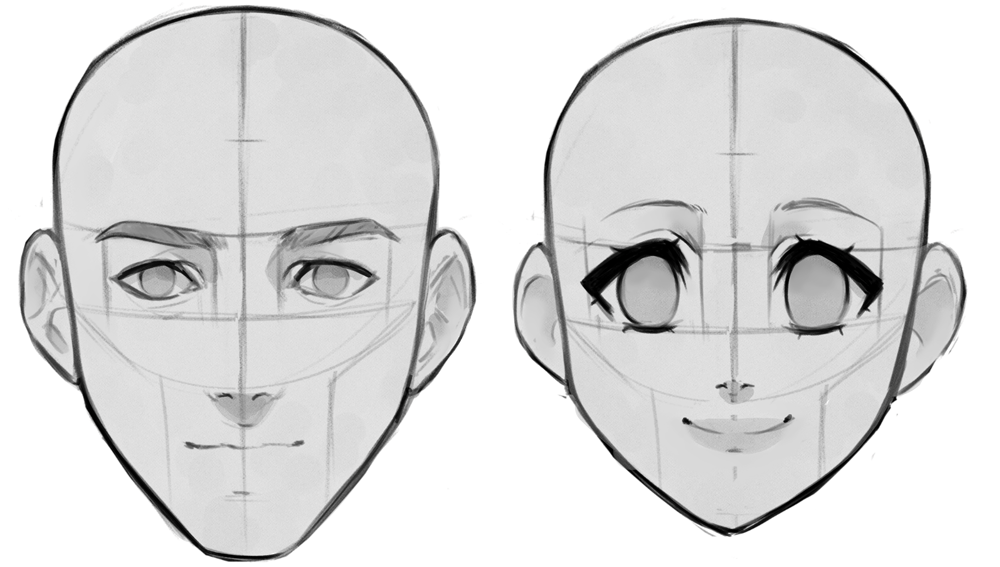
2. Real Optics vs Anime Eyes: Proportions
Accept a expect at the image below to see the difference between real eye proportions and anime-style proportions.
3. Variations
Since there are so many types and shapes when information technology comes to anime optics, beginning you need to retrieve almost what kind of optics you want to create.
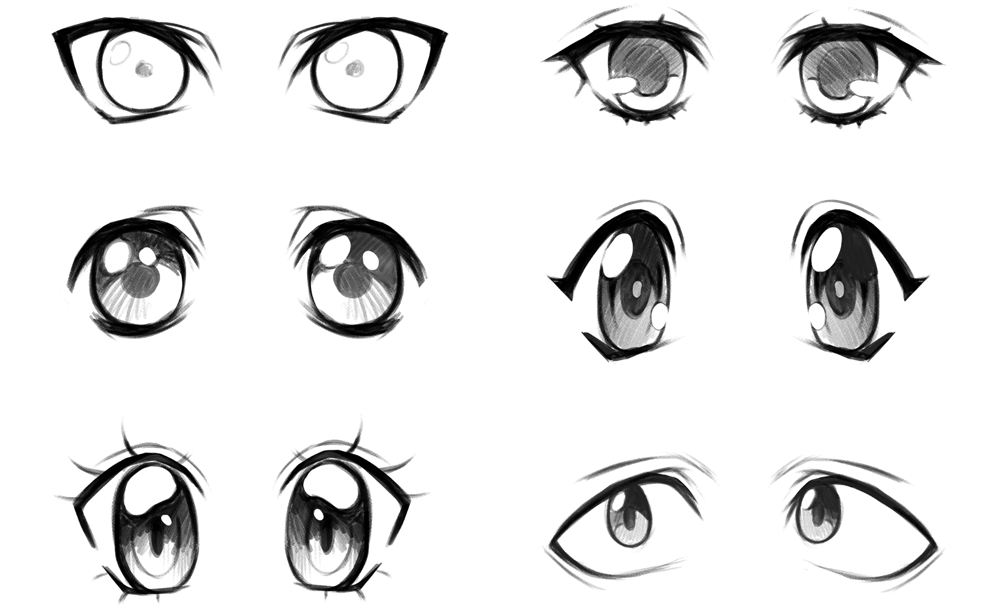
4. Styles and Greyscale
This is a expert mode to approach the exaggerated version of anime optics. Starting from some elongated shapes, add the necessary gray tones to create depth, always keeping the highlights and the structures that are most interesting to you in heed. See that in steps one and 2, I've but sketched the basic structure of the eye. Hither, you get the base for your eye and a guide to help you figure out where to identify the grey tones.
In step 3, I utilize subtle grays (I make the educatee surface area a petty darker than the balance of the center).
In step 4, I add darker grays to create depth on the upper part of the eye because the eyelid casts shadows on the eyeball. In this footstep, I experimented a fleck and added a lighter grey in the center of the pupil, to insert some originality.
In steps five and 6, I define and enhance the grays and textures.
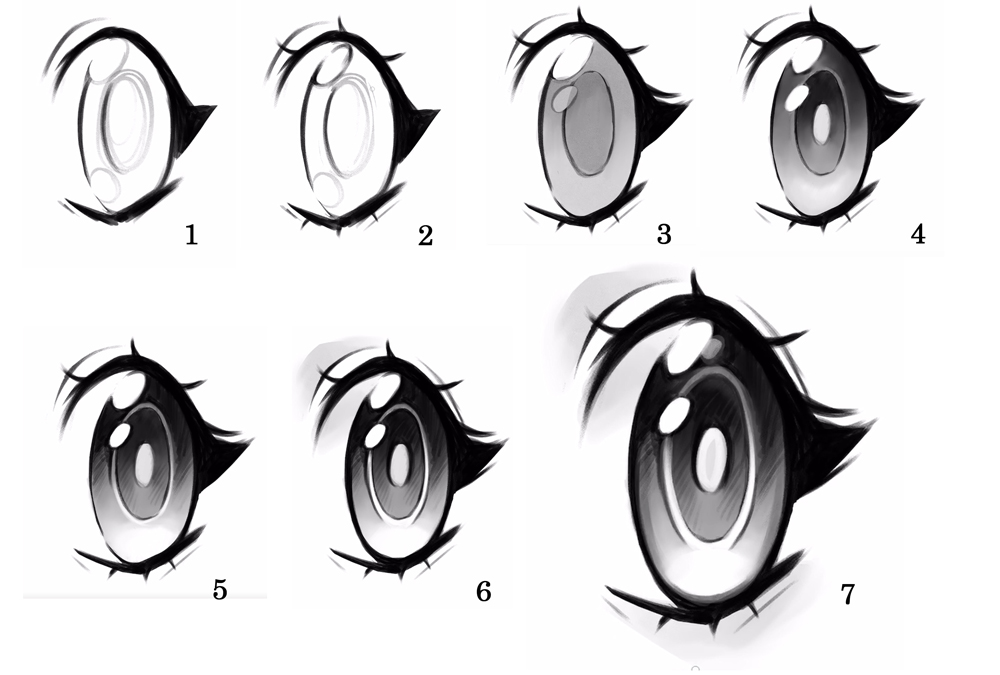
In pace vii, I brush up and detail all areas, every bit well as adding some extra smoothen a piffling less intense than the balance of the highlights.
To encounter all the details of this process, please have a look at the video at the beginning of the tutorial.
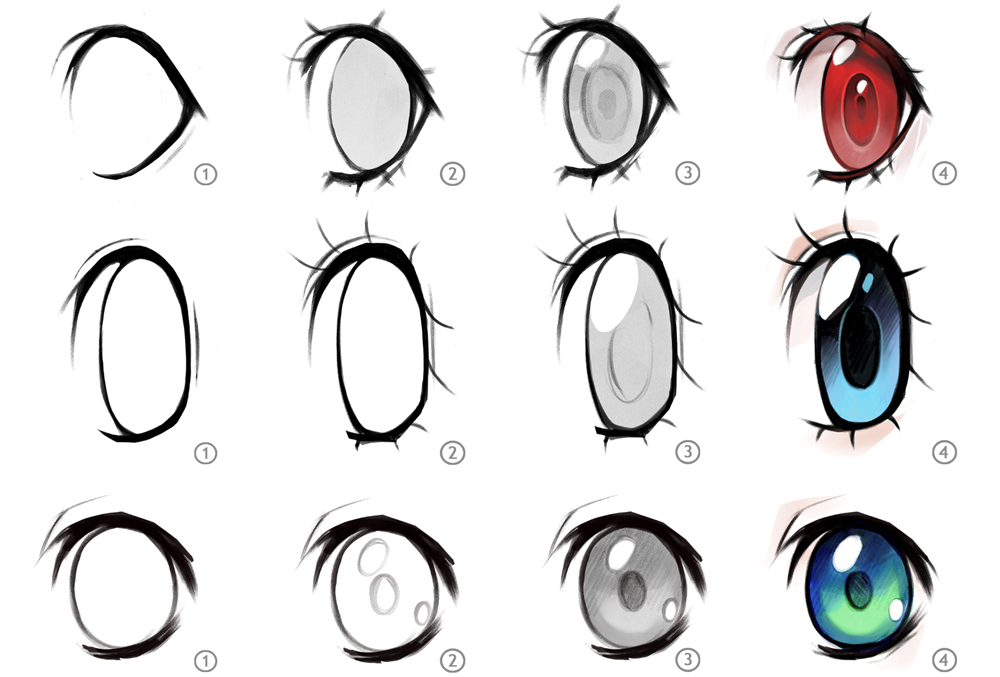
v. Shapes and Colors of Anime Eyes
It is helpful to split up the eye creation process into a few steps.
Allow'southward go back and break it down once more and add the coloring process. Allow me show you some coloring techniques parting from the grayscale drawing that nosotros already have from the previous part:
Call back: On top of the basic grays with their respective gradients, add effulgence and textures that match the way of your drawing (run across the example in the previous betoken).
Steps 1 and two, start by making the eyelids, this will help you to effigy out where to place the iris and the rest of the middle.
In step three, add some basic grey tones (check affiliate iv. "Styles and greyscale") so…
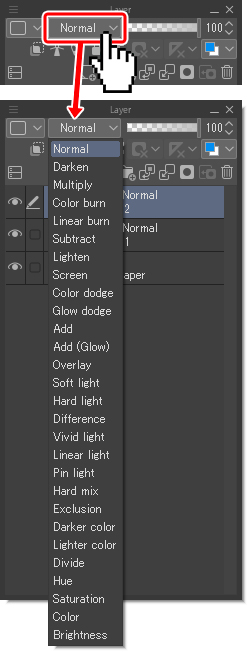
In step 4, I set up the color layer's blending manner. In this case, I used Overlay, but you lot are free to try a few out and cull another fashion that yous similar better. This way, the colour that you add together will exist perfectly integrated with the gray tones. On the right, you can see where the blending modes for layers are located in my software. The default mode is "Normal". From hither you can play effectually and find which fashion you lot are comfortable with.
If you're aiming for colorful, engaging anime optics, vibrant, saturated colors may be best.
6. How to Color Anime Eyes
Hither you can run across the results from using unlike colors and blending modes. I used the Overlay manner for purple, Vivid Light for yellow, and Pivot Light for the blue tones and the pink details. They blend great with the greyness layer.
The key is to know where you want to place the grey gradients, the darker areas, and the highlights. Please become back to affiliate 4. "Styles and greyscale" when in incertitude.
Effort different colors and see which ones are best for the effect you're trying to accomplish. In this illustration, I chose two complimentary colors: purple and yellow – with pink and blueish tints.
Grayscale coloring steps:
In ane, I simply started with the previously created grayscale drawing.
In steps 2 and 3, choose any color you lot fancy —purple, with some blue in my case— and try a blending mode that blends well with the greyscale.
In steps 4 and 5, I add some yellow using the Vivid light blending manner.
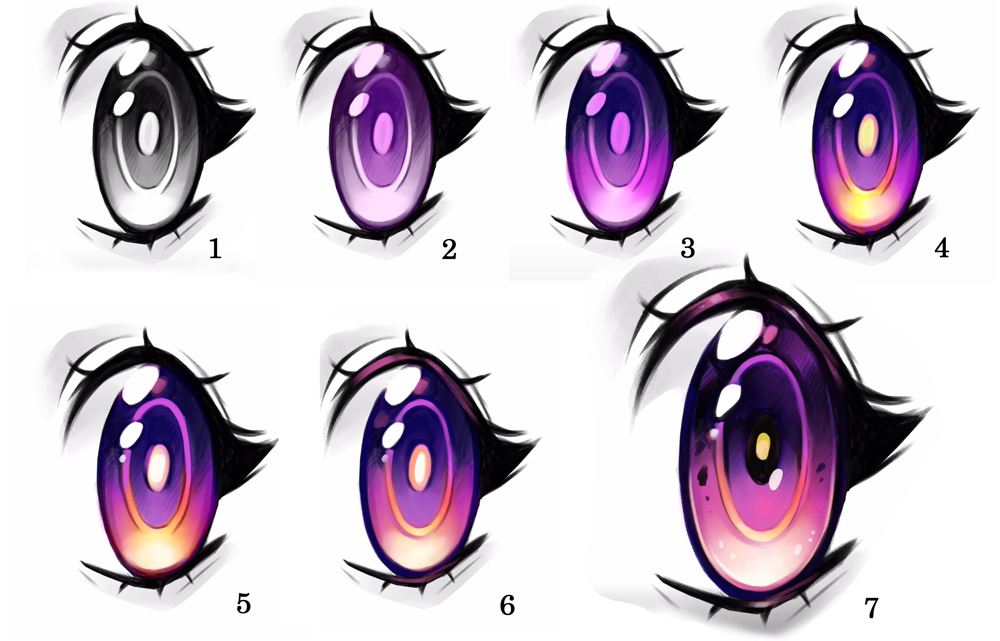
In pace 6, I usually soften the dots a bit, by using the eraser or decreasing the layer opacity.
Finally, in footstep 7, I only add together the finishing touches to emphasize volumes and textures.
vii. Expressions for Anime Eyes
In real life and in the manga/anime earth, eyes are i of the almost important features to express emotion. Remember that a series of facial muscles tighten or relax, depending on the expression you lot want to achieve.
Let's take a look at the eyelids, the inner middle, and the eyebrows.
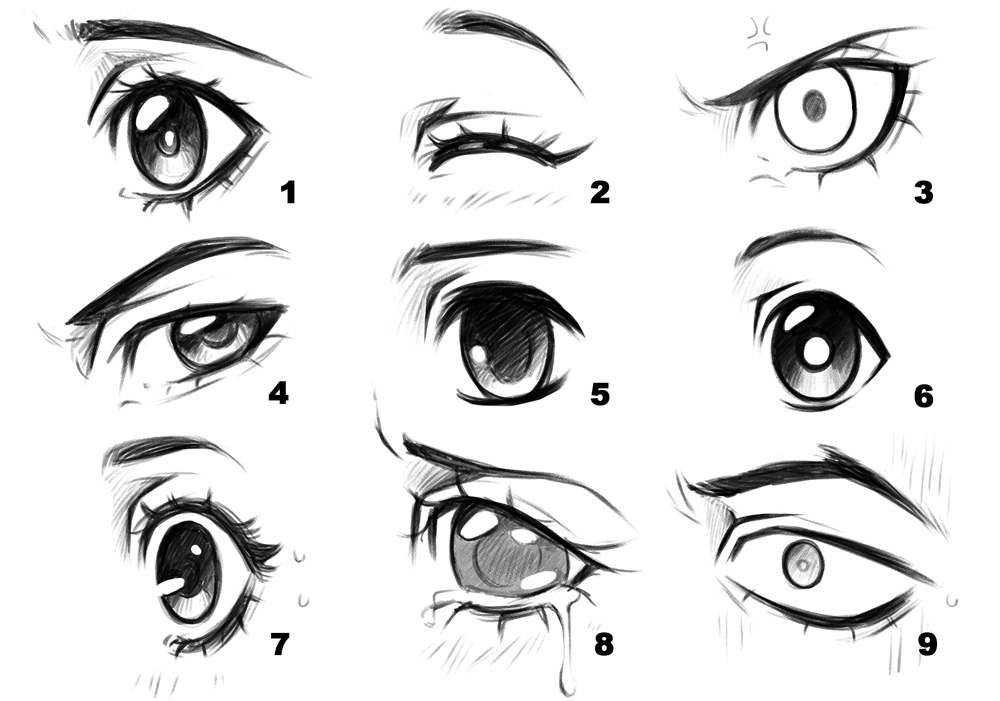
The emotions intended in these examples are easy to sympathise.
In instance 1, the eyebrow is a chip tense, just the eye is relaxed and shining. This conveys a worried country or maybe missing someone or something.
In case ii, the countenance is arched vertically, and the eye is airtight, so we tin deduce that the character is happy.
In the next case (3), there is no smoothen to the eye, the iris is completely white, and the pupil is reduced significantly. This shows that the character is aggressive. Annotation that the countenance is arched in the contrary management of the happy one in example 2, which also signifies anger.
Let us check all these expressions to deduce their significant: 4 is suspicion, 5 is worry, half-dozen is neutral or observing, 7 is stupor, 8 is sadness, and 9 is shock or madness, depending on the situation.
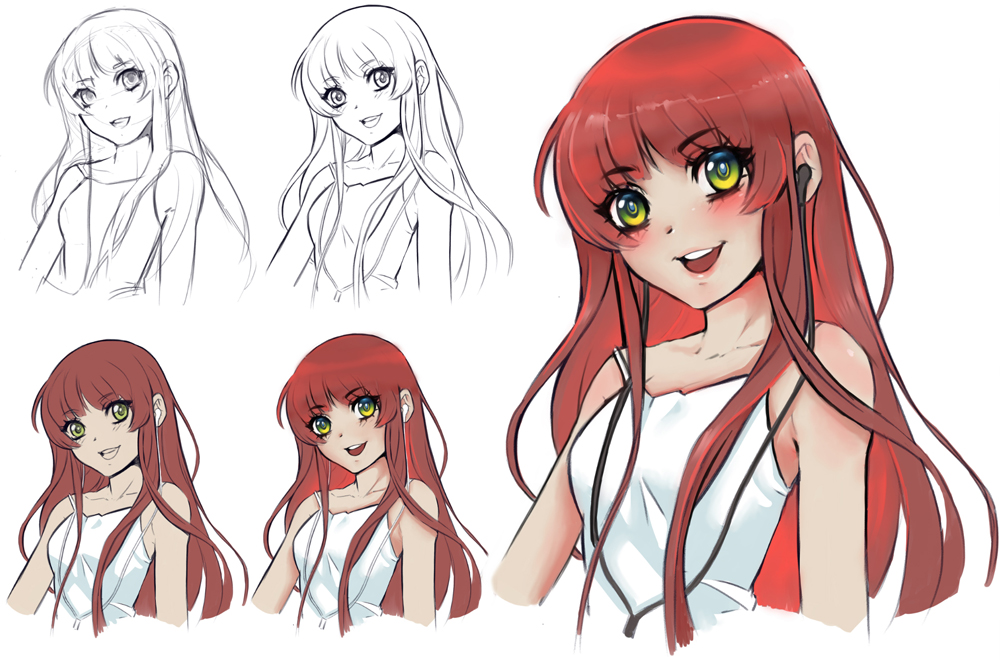
8. Final Illustration and Anime Eyes
Hither is a character illustration with anime optics. Notation how the colors and shapes piece of work together.
Source: https://www.clipstudio.net/how-to-draw/archives/162395
0 Response to "How to Draw Cool Anime Eyes"
Post a Comment